
All about beer
Fermenting under pressure
Fermenting under pressure means closing the fermenter instead of letting the gas escape through an airlock, and releasing CO2 only above a chosen pressure, usually 0.8 to 1 bar. The CO2 that stays dissolved slows the yeast's multiplication, and a yeast that multiplies less produces fewer esters and fusel alcohols. That is what lets you ferment a lager yeast at 18 °C, with no cold, and get a clean beer in three weeks instead of two to three months. The same technique carbonates the beer in the fermenter and lets you transfer it to a keg without it ever seeing air. This page explains the principle, the settings, safety, which is not negotiable, and what pressure does not do.
Updated on 23 October 2026
The principle
- During fermentation, the yeast produces roughly as much CO2 as alcohol. In an open fermenter or one fitted with an airlock, this gas escapes and the beer keeps only a little of it, less than 1 volume at 18 °C.
- In a closed fermenter, the pressure rises. An adjustable valve, called a spunding valve (from the German spunden, to bung a cask), lets out the gas above the set pressure and keeps the rest.
- Under 1 bar at 18 °C, the beer holds about 1.8 volumes of dissolved CO2. This CO2 and the pressure itself slow the yeast's growth: fewer new cells, so fewer esters (fruit, banana, pear) and fewer higher alcohols (solvent, heat).
- Fermentation itself, that is turning sugar into alcohol, carries on at almost the same pace as long as the pressure stays moderate.
What it brings
- A lager with no cold: a lager yeast held at 15-20 °C under 0.8 to 1 bar gives a beer close to a lager fermented at 10-12 °C, in half the time. It is the most common use among home brewers, often called a "fast lager".
- Free carbonation: at the end of fermentation, you raise the valve and the yeast's CO2 is enough to carbonate the beer; no priming, no CO2 cylinder for carbonation.
- Less oxygen: the fermenter stays full of CO2 from start to finish, the final cooling does not suck in air or the airlock liquid, and the beer goes into the keg through a closed transfer, pushed by its own pressure. This is precious for very hoppy beers, which oxidise quickly (see oxidation).
- Cleaner ales: an American ale or a blonde fermented under pressure at 20 °C keeps fewer esters; useful when you have no cool room in summer.
What it does not bring
- A guaranteed effect: the effect on esters is well established in large industrial tanks, where the pressure adds to that of several metres of beer. At the scale of a 20 to 30 litre fermenter it exists but is modest, and blind tastings by home brewers have not always found a difference. The choice of strain and holding the temperature count at least as much.
- A solution for beers that live on their esters: a weizen without banana, a saison without pepper or a Belgian beer without fruitiness lose their character. Under pressure, you make clean beers.
- A shortcut on yeast: the yeast quantity for a lager stays that of a lager, about double that of an ale (see brewing a lager).
- Sulphur disappearing: under pressure, the sulphur produced by lager yeasts escapes less. One to two weeks of cold conditioning remain useful, and you can purge the headspace once or twice at the end of fermentation.
Safety first
A 30 litre fermenter under 2 bar holds a force of several hundred kilos on its lid. The rules are not mere formalities:
- Never put under pressure a food-grade bucket, a glass carboy, a demijohn or an ordinary plastic fermenter: only fermenters and kegs designed and sold for pressure are suitable, within the pressure limit given by the manufacturer.
- Always a safety valve set below the vessel's maximum pressure, in addition to the spunding valve, and a readable pressure gauge.
- Check the seals, the lid thread and the safety valve before each batch; replace a cracked seal, and stop using a vessel that is cracked, deeply scratched or deformed.
- An old tank, a keg without a valve or a vessel of unknown origin is not put under pressure.
- Always depressurise before opening, through the valve, slowly: a beer under pressure opened in one go foams violently.
- Leave 20 to 25 % headspace: fermentation foam that reaches the spunding valve blocks it, and the pressure rises up to the safety valve.
- No bottles primed as usual with a beer fermented under pressure: see bottling below.
The settings
- Pitch as for a normal fermentation, at the planned temperature, with the strain's yeast dose (double that of an ale for a lager).
- Leave the valve open, or set very low (0.2 to 0.3 bar), for the first 12 to 24 hours: this is the growth phase, the yeast must be able to multiply. Applying pressure from pitching is the classic cause of a slow fermentation that stops too high.
- Once fermentation is well under way (foam, gas, falling gravity), set the valve at 0.8-1 bar. Home brewers rarely go above 1.2 bar during primary fermentation: higher, the yeast suffers and the final gravity stays high (see final gravity too high).
- Hold the chosen temperature: 15 to 18 °C for a lager yeast, 18 to 20 °C for an ale. Pressure does not make up for a temperature that climbs to 25 °C.
- When the gravity is 2 to 4 points from the final, raise the valve to the desired carbonation pressure (below): the last points of fermentation carbonate the beer. If fermentation has already finished, the pressure will not rise any more: you will then need some CO2.
- Final gravity stable over two readings, then check for diacetyl: warm a sample in a covered glass at 60 °C for 15 minutes, let it cool, smell it. A smell of butter means the beer needs two or three more days at fermentation temperature (see off-flavours).
- Cool towards 0-2 °C keeping the valve closed: the beer reabsorbs part of the headspace gas, the pressure drops on the gauge, which is normal.
Measuring the gravity of a beer under pressure means drawing a sample through the tap: it comes out full of foam. Let it degas by pouring it two or three times from one glass to another before measuring, otherwise the bubbles push the hydrometer up.
The carbonation pressure
The amount of dissolved CO2 depends on the pressure and the temperature of the beer: the warmer the beer, the more pressure is needed for the same number of volumes. A few benchmarks, calculated with the carbonation pressure tool:
- 2.5 volumes (a lager or a pale ale): about 1.8 bar at 18 °C, 1.4 bar at 12 °C, 0.7 bar at 2 °C.
- 2.2 volumes (a less sparkling beer): about 1.5 bar at 18 °C.
Above 1.2 bar, it is better to raise the valve only at the very end of fermentation. Another way: finish fermentation under 1 bar, cool, then adjust the carbonation cold, where much less pressure is needed; it is often the safest for a fermenter with a low maximum pressure. The CO2 volumes of each style are in the carbonation by style tool.
What about bottling?
A beer fermented under pressure already holds CO2, much more than a classic priming calculation assumes. The priming calculation starts from the CO2 left in a beer fermented open to the air: about 0.9 volume at 18 °C. Under 1 bar at the same temperature, about 1.8 is left. Adding the usual dose would give nearly 3.4 volumes instead of 2.5: bottles that gush when opened, or burst.
- The simplest: keg it, and serve from the keg or fill bottles from the keg, cold, when you drink them.
- To prime in the bottle: depressurise slowly at the end, let the beer degas for a day or two at fermentation temperature with the valve open, and calculate the priming for that temperature.
- Or count the CO2 already present: the sucrose dose is about 3.9 g per litre per missing volume. For 2.5 volumes with 1.8 already dissolved, that is about 2.7 g/L instead of 6.3 g/L.
- In every case, add a pinch of fresh yeast if the beer has spent several weeks cold (see flat or over-foaming beer).
Dry hopping under pressure
Dry hops often restart a small fermentation, "hop creep" (see successful dry hopping): under pressure, it shows on the gauge, and it carbonates the beer a little more. To add the hops you have to depressurise, open and close again; the beer, loaded with CO2, foams on contact with the cones or pellets, and oxygen gets in. You limit both by depressurising slowly, pouring the hops in gently and then purging the headspace, by applying and releasing the pressure two or three times.
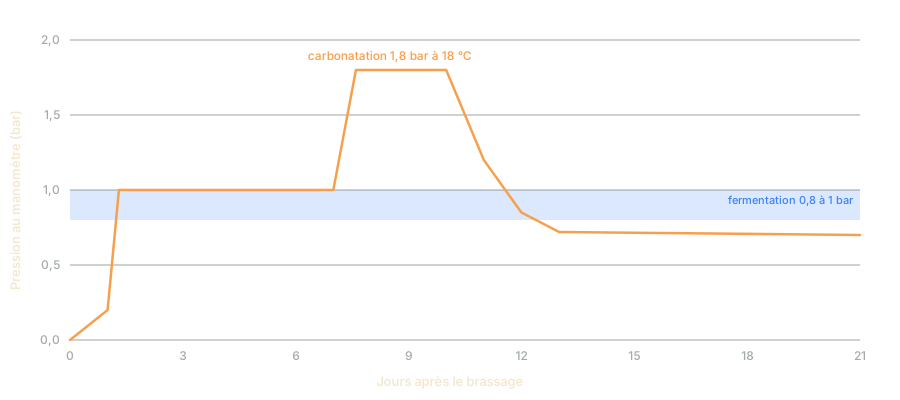
An example: a pils in three weeks
- D0: brewing a 20 litre pils (see brewing a lager), cooling to 15 °C, two packets of rehydrated lager yeast, oxygenation. Valve open.
- D1: fermentation has started, the wort has risen to 16-18 °C; valve set at 1 bar.
- D1 to D7: fermentation at 18 °C under 1 bar.
- Around D7: gravity at 1.013-1.014 for an expected final of 1.010; valve raised to 1.8 bar to carbonate to 2.5 volumes.
- D9 to D10: stable gravity, diacetyl test; cooling towards 1 °C, valve closed.
- D10 to D20: cold conditioning under pressure.
- D21: closed transfer to the keg, or serve directly.
Common mistakes
- Applying pressure from pitching: slow start, high final gravity.
- Going up to 2 bar in the middle of fermentation: stressed yeast, dragging fermentation.
- Not enough headspace: foam blocks the spunding valve.
- Priming a beer fermented under pressure as usual: bottles that gush or burst.
- Opening without depressurising: beer on the ceiling.
- Counting on pressure to rescue a fermentation at 25 °C: the beer stays hot and solventy.
- Thinking pressure replaces lagering: a lager under pressure still needs one to two weeks cold.
In the app
What Krausi does
Krausi does not track the fermenter's pressure: it is not part of the batch data. You can ask it to note in the batch's notebook that the fermentation is under pressure, to record the measured gravities and to set calendar reminders (set the valve on the second day, raise the pressure at the end of fermentation, cool). The carbonation pressure tool gives the pressure to set for the target volumes and the temperature.
Frequently asked questions
What pressure for pressure fermentation?
0.8 to 1 bar during primary fermentation, after a first day with no or almost no pressure. You then go up to the carbonation pressure at the very end of fermentation.
Can you make a lager at room temperature under pressure?
Yes, with a lager yeast at 15-18 °C under 0.8 to 1 bar, the result is close to a classic lager in three to four weeks. Above 20 °C, the result gets worse.
Do you need a special fermenter?
Yes. Only a fermenter or a keg designed for pressure, with a safety valve and a pressure gauge, can be put under pressure. Never a bucket, glass or ordinary plastic.
Is a beer fermented under pressure fizzy?
Partly: under 1 bar at 18 °C, it holds about 1.8 volumes of CO2, against 2.2 to 2.7 for a lager as served. You finish the carbonation by raising the valve at the end of fermentation, or cold.
Can you bottle a beer fermented under pressure?
Yes, but taking the CO2 already dissolved into account: degas before priming, or reduce the sugar dose, otherwise the bottles may gush or burst.
Other articles
Ready for your next brew?
Create your account, describe your first recipe to Krausi, and let him do the maths.